Showing posts with label Kids Activities. Show all posts

Monday, October 29

Spooky Pumpkin Cheesecake Bars


recipe slightly adapted from myrecipes.com

Go ahead and laugh. It's ok. I had a typical "me" moment the other day while making these. Short on time, I went to decorate these before work and realized I had bought regular sized chocolate chips instead of minis. The result is quite silly looking! I am still chuckling now looking at them.

Despite my googly eyed ghosts, these pumpkin cheesecake bars are absolutely amazing. Like lick the fork and maybe even your plate amazing. Creamy pumpkin with an oreo crust and topped with cool whip. Everyone who tried them loved them.

Ingredients for crust:
20 creme filled sandwich cookies
2 1/2 TBLS. unsalted butter, melted

Ingredients for filling:
2 (8 oz.) pkg. cream cheese, at room temperature
1 cup sugar
1 cup canned pumpkin pie filling
3 large eggs, at room temperature
1 tsp. vanilla extract
3 TBLS. all purpose flour
1 tsp. pumpkin pie spice
1/4 tsp. salt

Preheat oven to 350 degrees. Line an 9 inch square pan with foil so that it overhangs on the sides. Mist with cooking spray.

To make the crust: process the cookies in a food processor until ground. Pulse in butter. Press evenly into the pan. Bake until firm, 10 - 12 minutes. Cool slightly.

To make the filling: Beat cream cheese and sugar with an electric mixer until smooth, about 2 minutes. Beat in   pumpkin.Then eggs, 1 at a time. Beat in vanilla, flour, spice and salt until just combined.

Pour mixture over the slightly cooled crust. Put the pan in a large rimmed baking sheet and put in the oven. Pour hot water into the larger baking sheet until it's nearly filled. (This will prevent your cheesecake from cracking) Bake cheesecake until set around the edges but jiggles slightly in the center, about 40 - 45 minutes. Remove pan from sheet and cool completely on a wire rack. Cover with plastic wrap and chill until firm. At least 3 hours.

To make ghosts, pipe whipped cream onto bars in a circular motion. Use MINI chocolate chips for eyes.


Friday, April 6

Mini Egg Nests ~ Kid's Snack


Hello friends! Sorry I haven't blogged in so long. It it Spencer's Spring Break this week and I have been enjoying the extra time we have together. 


I made these for Spencer's class before the break. I am such a sucker for cuteness. Plus these are fun and easy to make. While not the healthiest of snacks, they aren't packed with tons of sugar either. The kids can help too!


Ingredients:
1 10 oz. package of marshmallows (I used strawberry flavored)
1/4 cup of butter
8-9 cups of Crispix cereal
1 package of mini eggs (I used Whopper eggs)


Melt butter in a large pan over medium heat. Add marshmallows, stirring as you add them. Stir constantly until marshmallows are melted and creamy. Remove from heat. Add cereal and immediately stir to coat completely.


Line standard size muffin tin with cupcake liners. Scoop marshmallow mixture into each cup and mold cereal to the sides, leaving an indentation in the middle. Place 3 mini eggs in the middle of each cup (while the centers are still warm). As the mixture cools, the eggs will stick to them to stay in place.


Store in tightly sealed container at room temperature.


Thursday, March 29

Edible Koi Ponds ~ Fun Snack for Kids


Good morning! Spencer's special needs class had a Chinese New Year's lunch at school this year. For the life of me, I couldn't come up with an idea on what to send and I had to send something. His teachers always do such fun things to interact the kids and anytime I can be a part of that, I am. Being that they are special needs kids of all ages, I wanted something visually fun for them, plus somewhat healthy. I can be so cheesy at times and this is one of those times. I mean come on, rice cakes, Chinese New Year? 


Spencer's teacher said the class loved them and there were no leftovers. Yay!


Super easy and the kids can make their own too.


Ingredients:
4 rice cakes (your choice of flavor)
1/4 cup whipped cream cheese (I used strawberry flavored)
blue food coloring
Goldfish


Put whipped cream cheese into a small bowl and add the blue food coloring a little at a time until you get the desired color for your water. Mix well after each addition before adding more.


Spread 1 TBLS. of cream cheese on each rice cake.


Top with goldfish. 


I think these are so cute!

Monday, February 6

Red Velvet Krispies

 recipe from passthesushi.com

Like red velvet, chocolate and rice krispies? Yeah, me too! Usually when a dessert looks this great, a lot of work is involved. Not so with this recipe. So pretty and super easy to make a batch. The bright red coloration makes them perfect for Valentine's Day but really, these krispies are sure to be a hit with any occasion. Kid friendly too! 

You could also use cookie cutters to make shapes (after they have cooled). Another way to get the kids involved in the kitchen.

Make sure to grab one of these for yourself as they won't last long!

Ingredients:
3 Tbls. butter
1 (10.5 oz) bag mini marshmallows
1 tsp. vanilla extract
3/4 cup red velvet cake mix
6 cups cocoa Rice Krispies cereal
4 oz. white chocolate chips, melted

Line a 9 x 13" pan with wax or parchment paper; coat well with cooking spray and set aside.

In a large saucepan, melt the butter over low heat. Add marshmallows, cake mix and vanilla, stirring frequently until melted and smooth. Fold in the cereal until well combined and coated.

Transfer the sticky cereal mixture to the prepared pan, pressing down until the top is level. Drizzle white chocolate over the top.

I wanted to make the photos for this with a Valentine's theme but was called in to work for a few hours. I brought a plateful along. Even short-staffed they only lasted minutes. Yeah!


Wednesday, February 1

Mini Raspberry Heart Cakes

 recipe from opensourcefood.com

Mmmmm...raspberry. One of my favorite flavors ever. Have you ever had raspberry syrup on your pancakes? If so, the filling for these is very close to that, if not better. 

Not only are these so easy and fun to make, but they are so cute. Perfect for any Valentine in your life. 

I think you could make many variations of this with different fruits, shapes and toppings. I plan on trying some down the road to hopefully share with you. I just thought these perfect for Valentine's Day. If you try any, please make sure and let me know!

Ingredients:
1 box yellow cake mix
1 cup raspberry jam
2 Tbls. water
2 pkg. fresh raspberries
1 oz. white chocolate

Bake cake according to package instructions. Cool completely.

Using a large heart shaped cookie cutter, cut cake into heart shapes. Split each heart horizontally into 2 layers of equal thickness.


Boil raspberry jam with water until thickened and brush onto top of each heart. Brush the darker, smoother side of the cut cake.


Stack two hearts together, forming a heart sandwich with the filling in the center. 


Arrange raspberries on top. Brush the raspberries with more jam. 


Drizzle melted white chocolate over tops. 


The kids might want to help too! 


*I used a 4" heart cookie cutter and made 5 mini cakes. 

Tuesday, January 24

Valentine S'mores Bites


I love Valentine's Day! I don't care that's it's completely over the top commercialized or have the hang up that we shouldn't need a special day to show someone we love them. It's so much fun despite and because of all those things. I am a total romantic at heart. Combine that with all the hearts, pink and red and I am right in the middle enjoying the allure the day can bring. 

Before I blog this recipe, let me add a few things I did so I don't confuse you. Much. I originally intended to make these with heart marshmallows and couldn't find them anywhere. Of course they are in every store NOW. These would be so much cuter with them! So either use a heart shaped cookie cutter and heart shaped marshmallows or a round cookie cutter with standard shaped marshmallows. OR be a dork like me and use a heart shaped cutter and standard marshmallows. You pick. 

Ingredients:
1-1/2 cups graham cracker crumbs
1/2 cup melted butter
dipping chocolate
heart shaped marshmallows (I used strawberry flavored regular)
sprinkles (I used heart shapes)


Mix melted butter and graham cracker crumbs together. Spread evenly into a foil lined 9 x 13 inch pan. Press down firmly, as firmly as you can using a spatula. This is important or when cutting the shapes, the base will break into pieces. Place in freezer for an hour. Remove the foil from the pan and use a mini cookie cutter to cut into shapes.


Dip the very bottom of the marshmallows into the dipping chocolate and place them on the top of your cut out graham cracker shapes.


Wait for them to cool. Then dip the whole thing back in the dipping chocolate. Place on wax paper and top with sprinkles.


Thursday, December 15

Christmas Cupcakes with Vanilla Buttercream Frosting


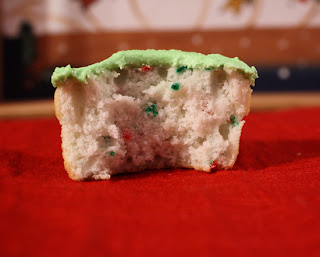
I think we can all agree that I am not the best cupcake decorator out there. These originally started out as Christmas "tree" cupcakes but the tree part got lost when I just started making leaning towers of frosting instead of anything that resembled a tree. I am perfectly OK with that since these are festive enough for me and were so much fun to make. They are also really really moist and delicious!


I used Baker's Corner Holiday Confetti box cake mix for the cupcakes. I have not used Baker's Corner products before and can I just say I am extremely impressed?! John found the cute cupcake present liners at our local Dollar store. 

confetti Christmas colors - love it!

So start off with your favorite cupcake recipe, boxed or otherwise. Then whip up this vanilla buttercream frosting.


Ingredients:
1 cup butter, softened
3 1/2 cups confectioner's sugar
1/8 tsp. salt
1 tsp. milk
1 tsp. vanilla extract


In a bowl, combine butter, sugar and salt. Beat until blended.


Add the milk and vanilla. Beat for an additional 3 to 5 minutes or until smooth and creamy.


I then used this handy little bottle of Wilton's Leaf Green Icing color. 4 dipped toothpicks produced this green which is exactly what I was looking for. I also saved about 4 tablespoons and used liquid yellow egg dye (food coloring) for the yellow tops.


 I used the small star shaped tip on my Wilton's cake decorating tool to make the frosting more "fun" than just using a frosting knife. Your choice. Add sprinkles for even more fun.


I keep these in an airtight container in the refrigerator. Get the kids to help with these too! Have fun. :) 

Friday, November 25

Homemade Peanut Butter Dog Treats ~ Christmas Gift Idea

 recipe from dogtreatrecipes.org

If your dog is anything like our pug, then you know how fast they can go through dog treats. Garbage disposal comes to mind... We like to reward Dexter for being a good boy or for just being his silly self and making us laugh when he tries some new stunt and fails miserably. 

I got the idea to make him some homemade treats after I saw how fast he demolished any store bought treat. This can get quite expensive and the thought of a healthy option for our garbage disposal sounded like a good idea too. 

These treats are so easy to make. They would be a great gift too for the fur babies in your life. Around here, even silly pugs get Christmas stockings.

Great activity for the kids to help out with too! They will feel proud making their own Christmas gifts and there is nothing better than spending more time with Spencer helping in the kitchen for me.


Ingredients:
2 cups whole wheat flour
1 Tbls. baking powder
1/2 cup oatmeal
1 cup peanut butter (smooth only, please)
1 cup milk


Preheat oven to 375 degrees. Lightly grease a baking pan.


In a medium mixing bowl, add flour, baking powder and oatmeal. Mix well. Add peanut butter and milk. Stir  until dough forms.


Turn the dough onto a lightly floured surface, knead it and then roll it out until it's about 1/4 of an inch thick. Break out your cute dog bone cookies cutters or a pizza cutter and cut the dough into desired shape and size. 

My cute helper

Bake for about 20 minutes or until golden brown. 


Cool before spoiling your fur baby. 


Store in an airtight container or reusable freezer bag. Amount made from recipe depends on the size of your cookie cutters. I used standard size cutters and made about 24.


Dexter approved!

Saturday, November 12

Thanksgiving Tepee Cupcakes

 recipe from stiesthoughts.blogspot.com

Aren't these just so darn cute?! I love creative people. I love it even better when creative people are willing to share their "how tos" for the rest of us to try! These were so much fun and the whole family helped, giving us some quality time together in the kitchen. 

I'll get right down to the good stuff!

Ingredients:
1 cake mix, flavor of your choice
sugar cones
pretzel rods
handful of chocolate chips
sprinkles
disposable aluminum baking pan

Preheat oven to 350 degrees. Mix cake mix according to package instructions.

Turn disposable baking pan upside down and poke with small holes. (use something small and round if you can compared to horizontal slits in the pan. This will help keep the cones upright while baking) Fill sugar cones 2/3 full and stand them in the holes made in the pan.

*Keep an eye on them to make sure they don't topple over while baking. You WILL have to reach in your oven and stand most of them back up as they are baking. Please be careful not to burn yourself!


Bake on lowest rack in oven for about 10 - 12 minutes or until batter springs back lightly when touched. Remove from oven and immediately snip off the bottom of the sugar cone - the pointed end- (which will now become the top of your tepee). You must do this immediately while the cone is warm and soft or it will break into pieces.

You can also snip off the end of the cupcake too if it is too rounded (to ensure your tepee stands up straight).

Take 3 pretzel rods and stick them on the top of your tepee. Melt a handful of chocolate chips in the microwave and stir until smooth. Dip the bottom of your tepee in the chocolate. This seals the bottom of the cupcake in and also gives you your frosting.  Then roll it in green sprinkles (for grass).    


Lastly, take a little melted chocolate and pipe it around the pretzels to hold them in place.


Daddy helping Spencer dip his tepee in the chocolate.


Sprinkle time!


 I used some scrapbooking supplies to decorate some marshmallows for my Pilgrims and Indians. Our friend "Nicole" (far left) stopped by our village.

Sunday, October 16

Cheesy Chicken Roll-ups


I found this on the back of a bag of Banquet Chicken Tenders and had to try it. Perfect finger food for game day! Also simple enough that the kids can help out too.


Ingredients:
1 can (8 oz.) refrigerated crescent roll dough
8 slices shaved honey ham, folded in half (I used thin sliced lunch meat)
4 thin slices mild cheddar cheese, halved 
8 frozen Banquet Original Chicken Breast Tenders


Preheat oven to 375. Spray baking sheet with no stick cooking spray.


Unroll crescent dough and separate into 8 triangles. Place 1 slice ham, 1 piece cheese and 1 tender crosswise over pointed end of each triangle. 


Roll dough over to enclose chicken. Place seam side down on baking sheet.


Bake 14-16 minutes or until dough is golden brown.


John and I used Ranch dressing to dip these in, Spencer used ketchup.


 On a side note, I received two awards this weekend from some blogging friends!!! Totally made my day. Will post about it soon!

Saturday, October 1

Hootin' Halloween Cupcakes


recipe idea from 6bittersweets.com

Boy, did I have fun making these cupcakes! They are part baking and part craft and would be so neat to share at a Halloween party. The kids would also have a blast helping and making some great owl faces. 


You could go the easier route and buy a packaged cupcake mix and frosting. However, if you can, you have to make these cupcakes as they were so good! I had a very hard time not eating them in mass quantities. Luckily I made them for Spencer's birthday party last week and sent some home with friends. 


Cookies and Cream Cupcakes


Ingredients:
1 cup milk
1 tsp. apple cider vinegar
3/4 cup granulated sugar
1/3 cup canola oil
1 & 1/2 tsp. vanilla extract
1 cup all purpose flour
1/3 cup cocoa powder
3/4 tsp. baking soda
1/2 tsp. baking powder
1/4 tsp. salt
1 cup chopped Oreo cookies (about 10 cookies)


Preheat oven to 350 and line 2 muffin pans with baking liners.


Whisk together milk and vinegar in a large bowl and set aside for a few minutes to curdle. Then add sugar and vanilla and beat until foamy with a hand mixer. 


In a separate bowl, sift together flour, cocoa powder, baking soda, baking powder and salt. Add, in two batches, to the wet ingredients. Beat until no large lumps remain (a few tiny lumps are ok). Gently fold in chopped Oreos.


Fill liners 3/4 full with batter. Bake 18 - 20 minutes or until toothpick inserted into the center comes out clean. Transfer to cool rack and cool completely before frosting.


Chocolate Ganache Frosting:


Ingredients:
1/2 cup heavy cream
5 oz. semi sweet chocolate, finely chopped
1 & 1/2 Tbls. light corn syrup


Combine the chocolate and cream in medium microwave safe bowl. Try to submerge the chocolate as much as possible. Microwave on medium for 1 minute. Stir and heat again in 15 second increments, stirring thoroughly each time until melted. Stir in corn syrup. Let cool and thicken (in fridge if needed) before using.


Making owl faces:


Ingredients:


1 package Oreo cookies, original
1 box Junior Mints
1 small bag of M&M or Reese's Pieces


Split Oreos crosswise, keeping the cream side whole. Microwaving 5 cookies at a time for 5 seconds helps keep the cream side solid. Use the dull side of a pairing knife to remove crumbs and to smooth the cream.


Sides without cream will be used for ears. Make 2 parallel cuts with a serrated knife 1/2 inch from rounded side, discarding the center strip left over.


Pair up the cream sides similar in amounts of cream. Gently push Junior Mints into the cream for the eyes. Be creative and put them in different directions or even cross eyed!.


Use a small spoon to smooth the Ganache frosting onto the top of the cooled cupcakes. Place decorated cream side cookies cream side up halves on the middle of the cupcakes. Gently push into frosting.


To make the ears, attach the cut cream-less Oreo cookie parts above the eyes, textured side facing up and rounded edges inward. These should hang over the edge of the cupcakes but be sure to press them into the frosting where possible.


Lastly press the M&Ms/Reese's Pieces (standing on their sides), between and slightly below the eyes, as beaks. 


Now show them off  to everyone!!


A girl owl! I used a scrapbooking bow I had for this. I put a small amount of chocolate frosting on the tip of the ear and pressed the bow into it. Too cute!

Saturday, September 17

Shark Cupcakes


recipes from MarthaStewart.com


Chocolate Cupcakes

Ingredients:

3/4 cup unsweetened cocoa powder
3/4 cup all-purpose flour
1/2 tsp. baking powder
1/4 tsp. salt
3/4 cup (1 &1/2 sticks unsalted butter), room temperature
1 cup sugar
3 large eggs
1 tsp. vanilla extract
1/2 cup sour cream

Preheat oven to 350 degrees. Line 12 standard muffin tins with paper liners.

Sift together cocoa, flour, baking powder and salt in medium bowl; set aside. In a mixing bowl, cream together butter and sugar until light and fluffy. Add eggs, one at a time, beating well after each, then beat in vanilla. With mixer on low, add flour mixture in two batches; alternating with sour cream, beginning and ending with flour. 

Pour batter into cups, filling each 3/4 cups full. Bake until toothpick inserted into centers comes out clean, 20-25 minutes.

Cool in pan 5 minutes, transfer to wire rack to cool completely, then frost.

Cream Cheese Frosting

Ingredients:

8 oz. cream cheese
8 Tbls. (1 stick) unsalted butter, cut into pieces, room temperature
1 cup confectioner's sugar
1 tsp. pure vanilla extract

Place cream cheese in a medium mixing bowl. Using a rubber spatula, soften cream cheese. Gradually add butter and continue beating until smooth. Sift in confectioner's sugar and beat until smooth. Add vanilla, stir to combine.

To color frosting blue (like the ocean), gradually add blue food coloring until you get desired color. Use blue construction paper to cut shark fins. Great activity to include the kids in!